How to Do a Burpee
Article posted in: Fitness
How do you spell “suffering” in six positions and six letters? Ask many modern exercisers, and they’ll tell you: B-U-R-P-E-E.
But the up-and-down exercise used in so many interval training workouts wasn’t created to be done in endless sets of 20, 30 or more—it was a fitness test invented to be done just three to four times.
And the exercise was invented, by its namesake and definitely-not-made-up person, Royal H. Burpee. Burpee’s signature move—minus the pushup and jump that are often incorporated today—was the centerpiece of his 1939 Ph.D. thesis in Applied Physiology.
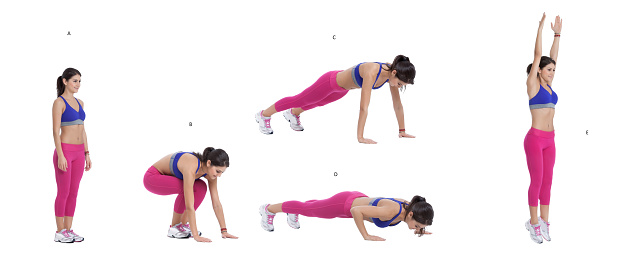
The purpose of the original move, according to Burpee’s granddaughter, who reportedly has one of the last surviving copies of the thesis, was to test the fitness levels of new members at New York City’s YMCA. Participants in the test had their heart rates tested before and after performing just four repetitions of what’s become known as a squat thrust or four-count burpee: Squat down, jump back to plank, jump back to the squat, and stand back up. The inventor even reportedly spoke out against high-repetition workouts of his test.
But science seems to back up your short-burst punishing burpee workouts: Interval workouts where high-intensity work is alternated with less-intense work or rest have been shown to burn more fat than steady-state exercise in multiple studies. And in one 2013 study published in PLOS ONE, very short bursts of exercise—just four minutes at a time—helped overweight participants lose weight and increase their VO2 max.
So feel free to burpee. Just use this step-by-step guide to doing the exercise safely—even at high speeds and high reps.
HOW TO DO A BURPEE:
Step 1: Starting stance
Stand with your feet hip-width apart, knees slightly bent, toes pointing slightly out. This position will make it easier to perform the squat correctly and keep you from tipping all of your weight onto your toes, which can put undue stress on your knees.
Step 2: Start your squat right
When you squat, don’t bend at the waist—hinge your hip. Here’s an easy way to get it right: Before you start, imagine you’ve got a bunch of groceries in your arms, and the car door is open behind you. Bump your butt back as if you were going to close the car door with it. That butt bump is a hip hinge. Now keep pushing your hips back to lower your body and squat while keeping your torso upright. In a burpee, you’re not doing just a squat, so you may come up on your toes a little as your hands reach the floor, but concentrate on keeping the weight of your body in your heels throughout the descent.
Step 3: Perfect your plank
Once you’ve jumped your feet back, make sure your straight-arm plank is perfect: Your hands should be directly beneath your shoulders, and your body should form a straight line from your head to heels. That means no sagging hips, and no “bump butt” where your behind is up above the line of your legs. This is the proper plank position, and though you won’t have time during your burpee, think about flexing all over—from gripping the ground with your hands to flexing your thighs—when doing it as a standalone plank hold.
Step 4: The proper pushup
The key to the proper pushup starts with that proper plank, with a rigid body line from head to heels. As you do your pushup, you should maintain this rigid body line as you bend your elbows until your chest nearly touches the floor. When you bend your elbows, don’t let them flare way out to the sides: Instead of your body forming a “T” shape, which can put stress on the front of your shoulder, think about forming the shape of an up arrow, with your head at the point and your upper arms forming the two diagonal arms.
If you can’t keep the rigid body line throughout the movement—that is, if your hips hike up, your butt sags, or there’s another breakdown—skip the pushup in your burpee and do them the way Mr. Burpee intended. Work on your pushups (and the straight line) outside of this move until you’re strong enough to incorporate it correctly.
Step 5: Stick the landing
After you’ve jumped back to the bottom of your squat position and shot into the air, your landing is key: Landing too harshly from jumps can cause your knees to cave together (called “valgus”) in a position that can put you at risk for ACL and other injuries. Try to land with your feet still hip-width apart, your knees slightly bent as you land, and your feet landing on the balls of your feet. If you feel any pain during or after this jump—in your knees, ankles, or low back—skip it. It’s not worth getting hurt just to show how tough you are, and Mr. Burpee didn’t include the jump, anyway.


