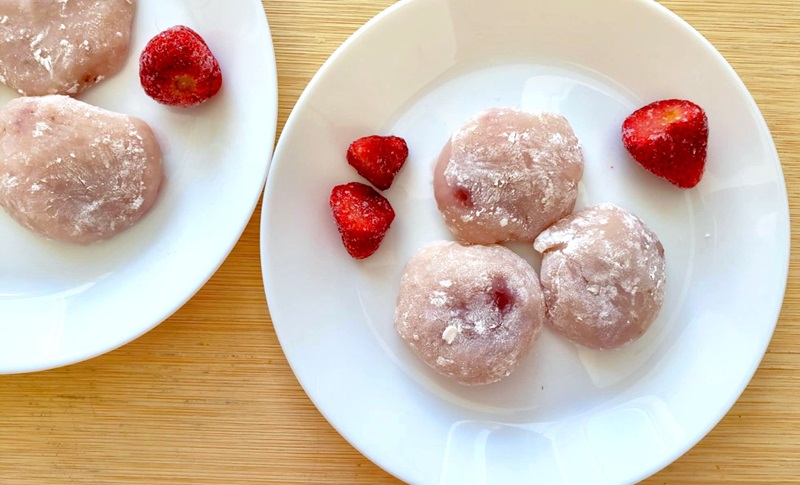
Chewy, sweet and bursting with juicy berry flavor, this easy strawberry mochi recipe is the perfect homemade treat for any mochi lover. If you’ve ever wanted to try your hand at making mochi at home but were intimidated by complicated techniques or hard-to-find ingredients, this recipe for strawberry mochi is your sweet solution. With just a few basic pantry staples and minimal hands-on time, you can whip up a batch of soft and pillowy strawberry flavored mochi that tastes as good as it looks.
Whether you’re a seasoned mochi enthusiast or completely new to the world of Japanese-inspired desserts, this mochi recipe is designed to be approachable, fast and absolutely delicious. Plus, with only 77 calories per serving and two Extras on Nutrisystem, it’s a sweet treat that won’t derail your healthy eating goals.
What is Strawberry Mochi?
Mochi is a Japanese rice cake made from glutinous sweet rice flour, also known as mochiko. It has a uniquely chewy texture that’s both satisfying and fun to eat.
In this strawberry mochi recipe, the dough is infused with real strawberry puree and a hint of strawberry jam for a double layer of fruity goodness.
This easy mochi recipe uses a microwave method that takes the hassle out of the traditional stovetop or steaming process, making it perfect for beginners or anyone short on time. The finished product is tender and stretchy on the outside, with a soft, jam-filled center that delivers a sweet burst of flavor with every bite.
How to Make This Easy Strawberry Mochi Recipe
The magic of this easy strawberry mochi recipe starts with just a few key ingredients. You’ll need mochiko (or glutinous sweet rice flour), a touch of sugar for sweetness, and a blend of milk and water to create the perfect mochi dough. Real strawberries are microwaved and mashed to add fresh flavor, while a small amount of oil helps create a smooth, workable texture.
The mixture is microwaved in short intervals, stirred well in between, and cooked until it reaches that signature stretchy consistency. After letting the dough cool, it’s coated in cornstarch to prevent sticking and divided into 12 equal pieces. Each piece is flattened into a disc and filled with about half a teaspoon of strawberry jam, then folded and sealed to form a bite-sized mochi treat.
One of the best parts of this recipe for strawberry mochi is that it’s freezer-friendly. You can make a batch ahead of time, store them in the freezer and simply thaw when you’re ready to enjoy. They also hold up well at room temperature for a couple of days, making them great for lunchboxes, afternoon snacks or even as part of a dessert spread.
Make It Your Own: Mochi Variations to Try
While this recipe focuses on strawberries, the base can easily be adapted to create other mouthwatering mochi variations. Here are a few ideas to get you started:
- Mango Mochi – Swap the strawberry puree and jam for pureed mango and a small dollop of mango preserves. It’s tropical, vibrant and perfect for summer.
- Matcha Mochi – Add 1-2 teaspoons of matcha powder to the dough for a rich green tea flavor.
- Chocolate Mochi – Stir in a tablespoon of unsweetened cocoa powder to the mochi dough, and fill with a bit of Nutella.
- Peanut Butter & Jelly Mochi – Keep the strawberry jam center, but add a dab of creamy peanut butter for a nostalgic twist.
- Lemon or Yuzu Mochi – Add lemon zest and a bit of juice to the dough for a citrusy zing, and fill with lemon curd.
These customizations make it easy to turn this easy mochi recipe into your signature creation. Feel free to experiment with different fruits, fillings and flavors to suit your taste or celebrate the season.
Why You’ll Love This Strawberry Flavored Mochi
Beyond its irresistible taste and texture, this strawberry flavored mochi recipe is a fantastic choice for many reasons:
- Beginner-Friendly – No steaming baskets or special tools required.
- Quick Cooking Method – The microwave technique cuts down on prep and cook time.
- Nutrisystem-Friendly – Each piece is just 77 calories and counts as two Extras on Nutrisystem, making it a smart indulgence.
- Versatile and Customizable – Easily swap in other fruits or fillings to match your cravings or the season.
- Perfect for Gifting or Entertaining – These little mochi balls are adorable, transportable and always a hit.
Final Thoughts
If you’re looking for a simple and satisfying way to enjoy homemade mochi, this easy strawberry mochi recipe is the perfect place to start. With a short ingredient list, no-fuss method and delicious results, it’s one dessert you’ll find yourself making again and again. And once you’ve mastered this version, the possibilities are endless—think mango mochi, matcha mochi, chocolate mochi and more.
So, grab your mochiko and strawberries, and let’s get rolling—this sweet and chewy adventure is just minutes away. Keep scrolling for the full mochi recipe and step-by-step instructions!
![]() Servings: 12
Servings: 12
![]() Calories per Serving: 77
Calories per Serving: 77
![]() On Nutrisystem, Count As: 2 Extras
On Nutrisystem, Count As: 2 Extras
Ingredients:
- 3-4 strawberries
- 1 cup mochiko or glutinous sweet rice flour
- 2 Tbsp. white sugar
- ½ cup water
- ½ cup milk
- 3-4 drops of oil
- ½ cup cornstarch
- 2 Tbsp. strawberry jam
Directions:
- Microwave a few strawberries in a bit of water to soften and release their juices. Mash well.
- In a microwave safe bowl, combine flour, sugar, water, milk, pureed strawberries and drops of oil. Mix until well-combined.
- Cover with plastic wrap or a microwave safe lid. Microwave for 2 minutes. Remove and stir the mixture well with a wooden or metal spoon. Repeat 2 more times for a total of 6 minutes in the microwave. The dough should come out stretchy.
- Let the dough rest until cool enough to handle. You may put it in the fridge to speed up the process.
- Spread some cornstarch on a cutting board or counter and coat the sticky dough.
- Divide it into 12 pieces and shape into a flat circle. Add about ½ teaspoon of jam to the center of each disc. Pull the edges of the dough to wrap together to cover the filling, pressing the edges together to seal well. Use more cornstarch as needed if too sticky.
- Store at room temperature for a few days or freeze it for longer storage, ensuring it's thawed before consumption.